Showing posts with label project. Show all posts

Monday, February 8, 2010

Project: Exploding Volcano!!!

Well, sort of :). Princess was a bit disappointed that our volcano didn't go boom. I think that she's been watching to much of Mythbuster's lately. Anyways, here how we made a volcano from scratch and then exploded it in the shower (that's right, in the shower).


First, we started by making some salt dough. For this project I chose a salt/cornstarch dough because it tends to dry quicker, here's my favorite recipe for that...
  • Mix 2 cups salt with 2/3 cup of water and heat over medium heat for several minutes. In another bowl mix 1 cup cornstarch and 1/2 cups of cold water. Remove the salt water from the heat and add in the cornstarch water. Return to the heat and stir continuously until thickened. Let cool a bit and then knead the dough until it's smooth and workable. This makes about 2 cups of dough.

So after making two batches of dough, we had enough to cover our glass bottle. Here's what it looked like (she's already started to paint it in this picture as I forgot to get the camera out on the first day, but you get the idea)...
Next we let our volcano dry for several days. This is where the size of you volcano makes a difference. The bigger the volcano = the more dough = very long time to dry. I had a friend who made a huge volcano (about 2 1/2 feet tall); very cool, but it took three weeks to dry! So after your volcano is dry, you can paint it. We opted for standard black paint, but you can use any color you like. Here's what it looked like after that...
After the paint dried(this took about 1/2 a day), we filled our bottle with 1/4 cup of baking soda, 2 Tbsp of liquid soap and some red food coloring. A funnel comes in real handy for this step, but if you don't have one or if your's has a wire mesh that won't allow baking soda through, like mine, you can always cut off the corner of a plastic bag.
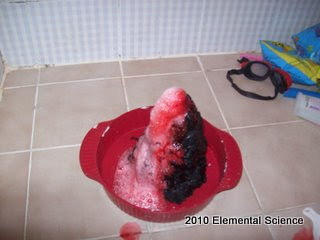
At this point I would move your volcano to a place that can get messy, such as outside, the sink or the shower. Now for the fun part, add 1/2 cup of white vinegar. Do this very quickly, as the reaction begins immediately! Here's what our volcano looked like as it was exploding...
We had alot of fun with this project, from start to finish! I highly recommend doing this at least once during your homeschooling journey.

ETA: I received an email from a dear friend of mine that let me know of another option for exploding your volcano. Apparently diet soda (preferrably orange as it makes cool colored lava) and a Tbsp of sugar creates alot more fun. We're going to try this later on in the week and I'll try to post a picture of it when we do. (We tried this and it didn't work for us, but I think that it's because we had alittle baking soda at the bottom of our volcano.)

Thursday, December 4, 2008

Gingerbread House...

I thought that this project deserved it's own post rather than being buried in the weekly report. Yesterday princess and I made our first every gingerbread house and I will attest to the fact that it's not as easy as it looks! We bought one of those kits to make it easier and I learned that one should begin by reading the directions. I didn't and ended up cutting the roof in half...
We had to use cans to brace our pieces while they dried, which was interesting, but it worked...
Princess really got into decorated it, which was worth all the effort. Here's the finished masterpiece...

Thursday, November 6, 2008

The Chicken Mummy

Yesterday we went to a friends house so that we could finish the chicken mummy project together. Here's what the chicken looked like after 6 weeks in the salt(changing it several times)...

I have to say that the smell of the salt was not the best, but once we cleaned him up, it was better. We coated the chicken with scented oil that we had made earlier. Then we started to wrap him. My friends daughter graciously offered up some of her old jewelry to use as amulets. We broke a cinnamon stick in half and put that in there too. Here's the final result...

All said and done, this was a fun project, but if I every get a chance to do it again, we are using an apple instead. There is something about rubbing oil on a dry shriveled up chicken that I just don't need to experience again. This project is truly a once in a lifetime project!

Friday, October 3, 2008

Fall Tree Project

Hot of the presses, here's our fall tree project! I got this idea from Crafts for Fall by Karen Ross, which I got from our library. The plans called for buttons, but since I had felt it seemed like a better idea. Princess used the glue gun all by herself for the first time. I think that it came out great and it's now the centerpiece for our kitchen table!
From the top so you can get a better view of the nest. Princess had the idea of using a magnoia seed for the egg and adding a small flower so it's not lonely!

Saturday, September 20, 2008

Chicken Mummy

So yesterday we went to our friends and did the first part of the chicken mummy (technically ours is a cornish game hen) but I forgot to take pictures!!! We had fun and it wasn't really that hard to do. Today we had to change the salt mixture because it was definately clumpy and wet, so I took some pictures.

Here's princess making the salt mixture to dry out the mummy...
Here's what the hen looks like after one day in salt...
Here's princess filling the cavity with the salt mixture...
Finally here's what the mummy look in it's salt bath...
This project so far has been really easy! I'll keep you updated, hopefully in six week we should have a cornish game hen mummy!